
You don’t need a gym or fancy equipment to build core strength, especially as a senior. The plank is one of the most effective exercises for improving posture, balance, and daily mobility, and it can be adapted for any fitness level. For seniors, traditional floor planks may feel intimidating or uncomfortable due to joint pain, limited mobility, or difficulty getting up and down. But with smart modifications, anyone can do planks safely and effectively.
This guide breaks down how to do planks for seniors using a step-by-step progression, from wall-supported versions to full floor planks. You’ll learn proper form, modifications for common limitations, and which variations offer the most benefit with the least strain. Whether you’re new to exercise or maintaining fitness, these strategies will help you strengthen your core without pain.
Start with Wall Planks
Wall planks are the easiest way to begin building core strength. They require no floor access and place minimal stress on joints, making them ideal for seniors with mobility issues or balance concerns.
Wall Plank: First Step
- Stand arm’s length from a wall
- Place hands flat on the wall at shoulder height, fingers spread
- Step feet back until your body forms a straight line from head to heels
- Engage your core by pulling your belly button toward your spine
- Keep hips level with shoulders; don’t let them sag or lift too high
Hold for 5–10 seconds at first, gradually increasing to 30 seconds. This version builds awareness of proper alignment without joint strain.
Pro tip: If balance is shaky, stand closer to the wall and shorten your stance.
Wall Forearm Plank: Easier on Wrists
If you have wrist pain or arthritis, this variation reduces pressure while still activating the core.
- Face the wall and place elbows on it, shoulder-width apart
- Rest forearms flat, fingers spread
- Step back until body forms a straight line
- Squeeze glutes and engage core to avoid arching your back
This is especially helpful for those with carpal tunnel or limited wrist mobility.
Why it works: It mimics the forearm plank position without requiring floor contact.
Use Elevated Surfaces
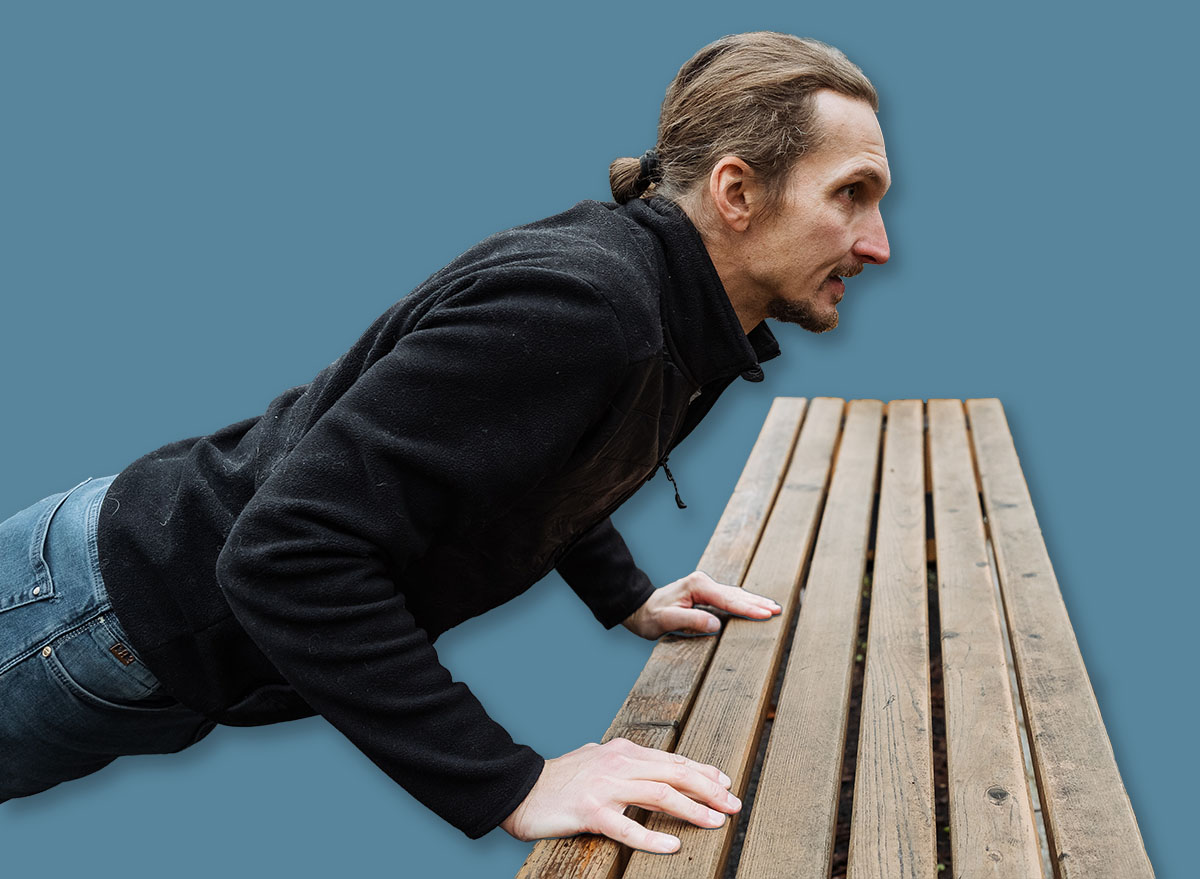
Once wall planks feel stable, progress to higher surfaces like a sofa or bed. These provide more challenge while keeping you safe and comfortable.
Sofa or Bed Plank
- Place forearms on a sturdy surface (sofa, bed, or bench)
- Step feet back until body forms a straight line from head to knees
- Keep core tight and hips in line with shoulders
- Avoid letting hips sag or rise too high
Difficulty tip: The lower the surface, the harder the exercise. Start high and gradually use lower furniture.
Safety check: Ensure the surface won’t slide. Test stability before leaning in.
Modify for Knee Comfort

Floor planks don’t have to mean knee pain. With a simple trick, you can protect your knees and still build strength.
Kneeling Forearm Plank
- Kneel on a rolled yoga mat or folded towel, and place it under your shins, not directly under knees
- This shifts pressure from kneecaps to shins, reducing joint strain
- Place forearms on the floor, elbows under shoulders
- Tuck pelvis, engage core, and form a straight line from shoulders to knees
Hold for 20–30 seconds. Focus on form, not duration.
Form cue: If your back starts to sag, reset by squeezing glutes and tightening your core.
Progress to Full Plank
When kneeling planks feel strong and stable, it’s time to try the full version. This increases core demand and improves functional strength.
Full Forearm Plank
- Start on all fours
- Step legs back, balancing on toes and forearms
- Keep body in a straight line: head, hips, and heels aligned
- Squeeze glutes and pull belly button in to prevent lower back arching
Hold 15–30 seconds initially. Stop if your form breaks.
Warning: If your hips sag or back arches, return to the knee version. Quality matters more than time.
Try Dynamic Variations
Static holds build endurance, but adding movement improves coordination and functional strength.
High Knee Plank (Modified Push-Up)
- Start in a high plank (hands under shoulders, feet together)
- Keep core tight and back flat
- Bend one knee and bring it toward your chest
- Return to start and alternate legs
Do 5–10 reps per side.
Bonus benefit: This is weight-bearing through the arms, which helps maintain bone density, ideal for seniors with osteoporosis.
Advance with Hip Extensions
These variations improve hip strength and mobility, which are critical for walking and standing from chairs.
Hip Extension Plank
- Start in a high plank with core engaged
- Lift one leg a few inches off the floor; just a small movement
- Keep your back flat and avoid arching
- Squeeze the glute to power the lift
Do 5–8 reps per leg.
Key point: The movement is subtle. If your back arches, stop and focus on glute engagement.
Master the Full Push-Up

For advanced seniors, the full push-up builds upper body and core strength together.
Full Push-Up from Plank
- From high plank, lower chest slowly toward the floor
- Keep elbows slightly tucked (not flared out) to protect shoulders
- Push back up with control
- Keep core tight throughout
Aim for 5–10 reps.
Why elbow position matters: Flared elbows increase shoulder strain. Tucked elbows improve joint safety and stability.
Use Proper Form Cues
Even the best variation won’t help if your form is off. These cues keep you safe and effective.
Align Head to Heels
- Maintain a straight line from head to heels (or head to knees in modified versions)
- Avoid hip sagging (sign of weak core) or hip hiking (reduces effectiveness)
- Use a mirror or ask someone to check your alignment
Visual cue: Imagine a ruler running from your head down your back, and keep it straight.
Breathe Steadily
Holding your breath increases blood pressure and tenses the body.
- Inhale and exhale naturally throughout the hold
- Never strain or hold your breath
- If you forget, count breaths: inhale for 2, exhale for 2
Pro tip: Breathing helps you stay relaxed and extend hold time.
Engage Core and Glutes
These muscles stabilize your spine and pelvis.
- Pull belly button toward spine to activate transverse abdominis
- Squeeze glutes to prevent lower back arching
- Think “tight from head to hips”
Test: If your lower back feels strained, you’re not engaging enough.
Choose the Right Modifications
You don’t need to do the “hard” version to get results. Smart modifications make planks accessible and effective.
Use Props for Support
- Rolled mat under shins: Reduces knee pressure
- Wall or sofa: Allows plank practice without floor access
- Fists on mat: Protects knuckles if you have arthritis
- Bed planks: Softer surface for those who can’t get on the floor
Philosophy: Modification isn’t failure; it’s smart training.
Follow Safety Guidelines
Planks are safe for most seniors, but certain conditions require extra caution.
Avoid These Form Mistakes
- Arching the back: Reset by engaging core and glutes
- Sagging hips: Push hips down and tighten abs
- Holding breath: Breathe steadily to stay relaxed
- Flared elbows (in push-ups): Keep elbows slightly tucked
Rule of thumb: If it hurts, stop. Pain is a signal to modify.
When to Stop or Modify
- If your back arches during hip extensions, skip the lift and focus on stability
- If full plank causes strain, return to knee version
- If the most advanced variation compromises form, skip it
Expert advice: “You don’t need to do all seven variations—pick 2–3 that feel manageable and build from there.”
Train Smart and Progress Gradually
Consistency beats intensity when building core strength as a senior.
Start with Short Holds
- Begin with 5–10 second holds
- Repeat 2–3 times per session
- Gradually increase to 20–30 seconds
Even short holds build neuromuscular connection.
Mindset: “The plank isn’t about how long you hold it—it’s about how well you hold it.”
Follow a Progression Plan
Use this order to advance safely:
- Wall Plank
- Wall Forearm Plank
- Sofa/Bench Plank
- Kneeling Forearm Plank
- Full Forearm Plank
- Hip Extension Plank
- Full Push-Up
Progress only when form is solid; don’t rush.
Train 2–3 Times Weekly
- Frequency: 2–3 sessions per week for strength gains
- Daily practice: Can build endurance faster, but only if recovery allows
- Rest days: Let muscles recover, especially if sore
Best approach: Start with 2 days, add a third as strength improves.
Know the Health Benefits
Planks do more than strengthen abs; they support overall health and independence.
Improve Posture and Reduce Pain
- Strengthens muscles that support the spine
- Reduces slouching and lower back strain
- Helps prevent falls by improving balance
Result: Stand taller, move easier, feel stronger.
Support Bone and Joint Health
- Weight-bearing versions (like high knee plank) stimulate bone density
- Safe for osteoporosis when done with proper form
- Protects joints through controlled movement
Key for seniors: Maintaining bone strength reduces fracture risk.
Boost Functional Mobility
- Helps with daily tasks like lifting, bending, and standing
- Hip extension planks improve ability to rise from chairs
- Floor-based training maintains the skill of getting up and down
Why it matters: The ability to get off the floor is a marker of longevity.
Adapt for Special Conditions
Planks can be tailored to common senior health concerns.
For Osteoporosis or Osteopenia
- Do weight-bearing planks like high knee plank
- Avoid excessive spinal flexion or twisting
- Focus on form and stability over duration
Benefit: Arm weight-bearing supports bone density in wrists and spine.
For Arthritis
- Use fists on a mat to protect knuckles
- Choose forearm planks to reduce wrist strain
- Warm up wrists with gentle mobility drills before starting
Tip: Do wrist circles for 30 seconds before and after.
For Limited Mobility
- Use wall or bed planks if floor access is hard
- Prioritize consistency over position
- If you can get on the floor, do so occasionally to maintain functional strength
Reality check: Floor training helps preserve independence.
Frequently Asked Questions About Planks for Seniors
What is the easiest plank variation for seniors with limited mobility?
The wall plank is the easiest starting point. It requires no floor access and places minimal stress on joints. Stand arm’s length from a wall, place hands at shoulder height, and step back into a straight line. Hold for 5–10 seconds and build gradually.
How long should a senior hold a plank?
Start with 5–10 second holds and repeat 2–3 times per session. Gradually increase to 20–30 seconds as strength improves. Quality of form matters far more than duration. If your hips sag or back arches, reset and try again.
Are planks safe for seniors with osteoporosis?
Yes, when done with proper form. Weight-bearing variations like the high knee plank support bone density through the arms. Avoid excessive spinal flexion or twisting, and prioritize form over hold time.
How can seniors protect their knees during kneeling planks?
Roll up a yoga mat or folded towel and place it under your shins, not directly under your knees. This shifts pressure from the kneecaps to the shins, significantly reducing knee strain.
Can seniors with arthritis do planks?
Yes. Use the wall forearm plank to reduce wrist pressure, or do high planks on your fists with a mat underneath to protect knuckles. Warm up wrists with gentle circles before and after your session.
How often should seniors do planks?
Train 2–3 times per week for strength gains. Daily practice can build endurance faster, but only if your body recovers well between sessions. Start with 2 days and add a third as you get stronger.
Key Takeaways for Doing Planks Safely as a Senior
Planks are one of the most accessible and effective exercises for building core strength, improving posture, and supporting independence. You don’t need a gym, special equipment, or perfect mobility to get started. Begin with a wall plank and progress gradually through the seven variations at your own pace. Focus on form over time, breathe steadily, and use props like rolled mats or elevated surfaces whenever you need them. Consistency matters more than intensity, so aim for 2–3 sessions per week and celebrate small wins along the way. Start today with a simple wall plank and build your strength one hold at a time.